ldap
ldap 是轻量级目录管理访问协议。
Server端安装
Install the following packages:
yum install -y openldap openldap-clients openldap-servers migrationtools
Server端配置
Configure OpenLDAP Server
vim /etc/openldap/slapd.d/cn\=config/olcDatabase\=\{2\}hdb.ldif
change two lines:   #change  dc=alv
olcSuffix: dc=alv,dc=pub
olcRootDN: cn=natasha,dc=alv,dc=pub
add one line:
olcRootPW:  123456 #密码根据自己需要修改,主要密码前面是个tab
Configure Monitoring Database Configuration file:
vim /etc/openldap/slapd.d/cn\=config/olcDatabase\=\{1\}monitor.ldif
#修改dn.base=""中的cn、dc项与step2中的相同
olcAccess: {0}to * by dn.base="gidNumber=0+uidNumber=0,cn=peercred,cn=extern
al,cn=auth" read by dn.base="cn=natasha,dc=alv,dc=pub" read by * none
Prepare the LDAP database
cp /usr/share/openldap-servers/DB_CONFIG.example /var/lib/ldap/DB_CONFIG
chown -R ldap.ldap /var/lib/ldap
Test the configuration
slaptest -u
56e7c83d ldif_read_file: checksum error on "/etc/openldap/slapd.d/cn=config/olcDatabase={1}monitor.ldif"
56e7c83d ldif_read_file: checksum error on "/etc/openldap/slapd.d/cn=config/olcDatabase={2}hdb.ldif"
config file testing succeeded  #验证成功
Start and enable the slapd service at boot
systemctl start slapd
systemctl enable slapd
Check the LDAP activity:
netstat -lt | grep ldap
netstat -tunlp | egrep "389|636"
To start the configuration of the LDAP server, add the follwing LDAP schemas
cd /etc/openldap/schema/
ldapadd -Y EXTERNAL -H ldapi:/// -D "cn=config" -f cosine.ldif
ldapadd -Y EXTERNAL -H ldapi:/// -D "cn=config" -f nis.ldif
ldapadd -Y EXTERNAL -H ldapi:/// -D "cn=config" -f collective.ldif
ldapadd -Y EXTERNAL -H ldapi:/// -D "cn=config" -f corba.ldif
ldapadd -Y EXTERNAL -H ldapi:/// -D "cn=config" -f core.ldif
ldapadd -Y EXTERNAL -H ldapi:/// -D "cn=config" -f duaconf.ldif
ldapadd -Y EXTERNAL -H ldapi:/// -D "cn=config" -f dyngroup.ldif
ldapadd -Y EXTERNAL -H ldapi:/// -D "cn=config" -f inetorgperson.ldif
ldapadd -Y EXTERNAL -H ldapi:/// -D "cn=config" -f java.ldif
ldapadd -Y EXTERNAL -H ldapi:/// -D "cn=config" -f misc.ldif
ldapadd -Y EXTERNAL -H ldapi:/// -D "cn=config" -f openldap.ldif
ldapadd -Y EXTERNAL -H ldapi:/// -D "cn=config" -f pmi.ldif
ldapadd -Y EXTERNAL -H ldapi:/// -D "cn=config" -f ppolicy.ldif
Now use Migration Tools to create LDAP DIT
cd /usr/share/migrationtools/
vim migrate_common.ph
on the Line Number 61, change "ou=Groups"
$NAMINGCONTEXT{'group'} = "ou=Groups";
on the Line Number 71, change your domain name
$DEFAULT_MAIL_DOMAIN = "sophiroth.com";
on the line number 74, change your base name
$DEFAULT_BASE = "dc=alv,dc=pub";
on the line number 90, change schema value
$EXTENDED_SCHEMA = 1;
Generate a base.ldif file for your Domain DIT
./migrate_base.pl > /root/base.ldif
Load “base.ldif” into LDAP Database
ldapadd -x -W -D "cn=natasha,dc=alv,dc=pub" -f /root/base.ldif
Now Create some users and Groups and migrate it from local database to LDAP
mkdir /home/guests
useradd -d /home/guests/ldapuser1 ldapuser1
useradd -d /home/guests/ldapuser2 ldapuser2
echo 'password' | passwd --stdin ldapuser1
echo 'password' | passwd --stdin ldapuser2
Now filter out these Users and Groups and it password from /etc/shadow to different file
getent passwd | tail -n 5 > /root/users
getent shadow | tail -n 5 > /root/shadow
getent group | tail -n 5 > /root/groups
Now you need to create ldif file for these users using migrationtools
 cd /usr/share/migrationtools
 vim migrate_passwd.pl
 #search /etc/shadow and replace it into /root/shadow on Line Number 188.
./migrate_passwd.pl /root/users > users.ldif
./migrate_group.pl /root/groups > groups.ldif
Upload these users and groups ldif file into LDAP Database
ldapadd -x -W -D "cn=natasha,dc=alv,dc=pub" -f users.ldif
ldapadd -x -W -D "cn=natasha,dc=alv,dc=pub" -f groups.ldif
Now search LDAP DIT for all records
ldapsearch -x -b "dc=alv,dc=pub" -H ldap://natasha.alv.pub
客户端安装配置调试
yum install -y nss-pam*
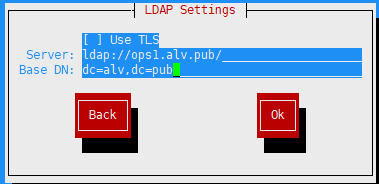
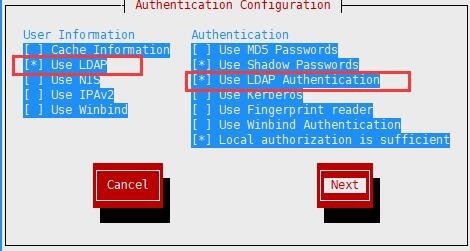
authconfig-tui #chose the secend [ Use LDAP] and next
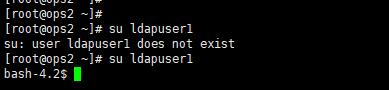
su ldapuser1
bash-4.2$ #测试成功
以上是通过图形化的方式配置,也可以通过命令直接配置
yum install nss-pam-ldapd setuptool -y
authconfig --enableldap  --enableldapauth --ldapserver=ldap://natasha.alv.pub --disableldaptls  --enablemkhomedir --ldapbasedn="dc=alv,dc=pub" --update
然后就可以了。
getent shadow ldapuser1
getent passwd ldapuser1
id ldapuser1
重启服务
如果修改过客户端的配置,比如换了一台ldap服务器,那么需要重启一下服务,重新加载nslce进程,执行下面的命令
#service nslcd restart
systemctl restart nslcd
ldap用户的添加和删除
添加ldap用户和组
这里我们在一个已经搭建好了ldap环境的服务器上添加一个名为diana的用户,密码也是diana
- 创建用户并设置密码
useradd -d /ldapUserData/diana diana #这里因为我们使用的ldap服务在设计上是讲/home/guests/目录作为ldap用户的上级目录,所以diana的目录为 /home/guests/diana
echo diana|passwd diana --stdin
- Now filter out these Users and Groups and it password from /etc/shadow to different file:
getent passwd|tail -1 > /root/users
getent shadow|tail -1 > /root/shadow
getent group|tail -1 > /root/groups
- Now you need to create ldif file for these users using migrationtools:
cd /usr/share/migrationtools
./migrate_passwd.pl /root/users > users.ldif
./migrate_group.pl /root/groups > groups.ldif
- Upload these users and groups ldif file into LDAP Database:
ldapadd -x -W -D "cn=natasha,dc=alv,dc=pub" -f users.ldif
ldapadd -x -W -D "cn=natasha,dc=alv,dc=pub" -f groups.ldif
##上面的-W参数是交互式输入密码,如果不想交互式输入密码,可以将-W替换为-w,并在-w后面添加ldap管理员密码。
##示例:ldapadd -x -w $ldapPassword -D "cn=natasha,dc=alv,dc=pub" -f users.ldif
删除用户和组
删除用户
这里我们删除用户natasha
ldapPassword=your_password
ldapdelete -x -D "cn=natasha,dc=alv,dc=pub" -w $ldapPassword "uid=natasha,ou=People,dc=alv,dc=pub"
如果用户信息不对,我们可以通过以下命令来查看相应用户的信息
ldapsearch -x -b "dc=alv,dc=pub" -H ldap://natasha.alv.pub|grep natasha
删除组
ldapdelete -x -D "cn=natasha,dc=alv,dc=pub" -w $ldapPassword "cn=natasha,ou=Groups,dc=alv,dc=pub"